Tips on How to Contour Like the Pros!
Is Contouring the Ultimate Makeup Con?
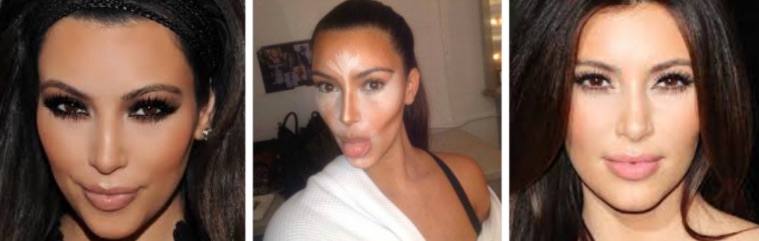
The new version of concealing isn’t about carving a line into your cheek – it is all about enhancing cheekbones, slimming your face, and tricking the eye in a believable way. Something our Kimmy is the queen of…well her makeup artist anyway. There are 2 basic hard and fast rules…remember the black and white rule?
Black makes you look thinner and white makes you look wider. Just apply this to the face… right? Who does this but…just give it a go. In front of the mirror really look at your face, as if it were a still life and then think about the places you want to add dimension with make up. It’s an amazing way to shape your nose, define your cheeks and create highlights and shadowing!
Here’s a little step by step guide for you experimenters out there:
- Feel the contours of your face. Apply the contour colour directly underneath your cheekbone, normally a matt brown powder 2 shades darker than your skin tone. Extend from the centre of your ear in a slightly downward motion. You will want to keep the contour application concise. If your brush feels too fluffy or large, pinch the bristles when you apply, this will give you more control and more definition too.
- Use a small eye shadow brush to softly line both sides of the nose again with the brown matt powder. If your nose is long, you may want to apply a little under the tip of your nose. Again, keep the applications concise.
- Feel your jaw. You will apply your contour colour below your jawbone, making sure not to apply any colour to the actual bone. The point is to create a shadow below your jaw. If your jaw is larger, you can bring the contour colour up on either side of the chin. This will make your jaw appear less bold.
- Blend your contour colour into your hairline. Doing this really helps make your face appear slimmer. Blend well into the hairline.
- Although your colours may be dramatic, there should be no severe lines. Blend edges well. Highlighting your face makes your skin glow, helps to minimise or maximise facial features and gives you that finished healthy sheen you see in mags!
The Low-down on Highlighting
Highlighting your face brings it to life, but you need to be careful where you put the highlighter as popping it in the wrong spots can both age you and give you that dreaded greasy skin look. When it comes to highlighting the colour of the product you use to highlight your face with must be slightly lighter than your skin tone. The product also needs to contain a slight shimmer to make you look all healthy, fresh and youthful with that glow!
Places you should never highlight:
- Heavily blemished areas – it will just make them more obvious
- Areas that have lines and wrinkles Under your eyes or around puffy, tired eyes
- On already oily areas
Where to highlight to achieve that perfect, glowing, magazine skin:
- Straight down the middle of your nose (unless your nose is very wide, in which case you should skip this step)
- Underneath the brow
- The top of the cheek bones (with a straight face – don’t do this one smiling)
- A tiny bit in the centre of the forehead.
- Around the jaw line
HOT TIP
Apply a small amount of highlighter to the area above the middle of the top lip (the cupids bow) – this will make your lips pop and look extra pouty and full.
Have you girls tried contouring and highlighting? Give it a try, it takes a little practice but can really change the shape of your face. You can see why Kimmy is in love with her make up guru & the magic she works with this technique!
You can check out more of Claire’s work here