Easter Bunny Cake Recipe
Easter Bunny Cake
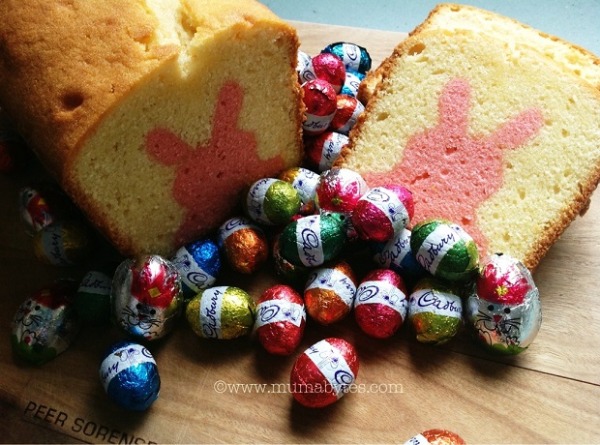
This super-cute Easter Bunny Cake Recipe is quite easy to make, and it absolutely delights the little ones.
This is essentially a cake within a cake, so you will be preparing two cake mixes. One baked cake is cut out into bunny shapes using a cookie cutter. The bunny shapes are then lined up in the same cake tin and the second cake batter is poured around it for re-baking.
Pound cake or butter cake is ideal for this one because you need a cake that is dense and will hold together well. If you use a soft, fluffy cake mix, the bunnies could break apart when you pour the second cake batter over it. Those ears break easily, so be extra careful.

Ingredients per cake (you will be making 2 cakes):
4 eggs at room temperature
2 cups plain flour
250g salted butter – softened, room temperature
1 cup caster sugar
3 drops of pink gel food colouring (for one cake only)*
1 tsp baking powder
Equipment:
Bunny-shaped cookie-cutter*
Loaf tin
Method:
1. Preheat oven to 180C and line a loaf tin with baking paper. A regular loaf tin may not be deep enough. Make sure you measure your tin against the height of your cookie-cutter to know that it will fit. (For this cake, I used a loaf tin measuring: (L)24.5 x (W)10 x (H)9.5cm)
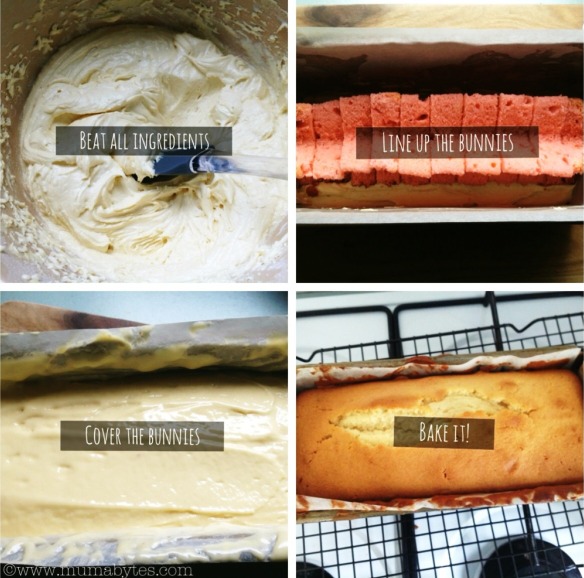
2. Use an electric mixer to beat the butter on high for a few minutes until creamy and pale. Then add the sugar and continue for several minutes.
3. Add the eggs one by one, beating in each egg as you add it.
4. Add the baking powder to the flour, and gradually pour it into the butter mixture. Beat well.
5. Add about 3 drops of food colouring at this point, mixing well after adding.
6. Spoon the batter into the prepared tin and bake for about 1 hour. (You may want to cover it with foil about half-way through baking to prevent over-browning.)
7. When the cake is cooked, let it cool for about half an hour before slicing the entire loaf. The thickness of the slices should match the thickness of the cookie cutter.
8. Cut out your bunny shapes, and set aside. Be careful the ears don’t break!
9. Re-line the cake tin, and prepare another cake batter, except do not add any food colouring this time.
10. Spread a thin layer of cake batter on the bottom of the tin, then line up the bunnies. Use a spoon to distribute the batter all around and on top of the bunnies. (If your batter is too thick, you can beat in some milk to thin it out a little.)
11. Bake for another hour, covering with foil part-way through to avoid over-browning.
12. Let the cake cook completely before slicing and serving.
*Gel food colouring is found in most baking and kitchenware shops.
*Bunny-shaped cookie cutters can be found online and in shops such as The General Trader, House, Riot Arts & Crafts and other kitchenware stores.
Total Time: 3 hours
Author: Katie from Mumabytes
Ingredients
- 4 eggs at room temperature
- 2 cups plain flour
- 250g salted butter – softened, room temperature
- 1 cup caster sugar
- 3 drops of pink gel food colouring (for one cake only)*
- 1 tsp baking powder
Instructions
- Preheat oven to 180C and line a loaf tin with baking paper. A regular loaf tin may not be deep enough. Make sure you measure your tin against the height of your cookie-cutter to know that it will fit. (For this cake, I used a loaf tin measuring: (L)24.5 x (W)10 x (H)9.5cm)
- Use an electric mixer to beat the butter on high for a few minutes until creamy and pale. Then add the sugar and continue for several minutes.
- Add the eggs one by one, beating in each egg as you add it.
- Add the baking powder to the flour, and gradually pour it into the butter mixture. Beat well.
- Add about 3 drops of food colouring at this point, mixing well after adding.
- Spoon the batter into the prepared tin and bake for about 1 hour. (You may want to cover it with foil about half-way through baking to prevent over-browning.)
- When the cake is cooked, let it cool for about half an hour before slicing the entire loaf. The thickness of the slices should match the thickness of the cookie cutter.
- Cut out your bunny shapes, and set aside. Be careful the ears don’t break!
- Re-line the cake tin, and prepare another cake batter, except do not add any food colouring this time.
- Spread a thin layer of cake batter on the bottom of the tin, then line up the bunnies. Use a spoon to distribute the batter all around and on top of the bunnies. (If your batter is too thick, you can beat in some milk to thin it out a little.)
- Bake for another hour, covering with foil part-way through to avoid over-browning.
- Let the cake cook completely before slicing and serving.

Katie is a full-time mum and blogger at Mumabytes. A Melbourne girl, she never says no to chocolate, and loves to share her ramblings about all things motherhood.